Our Location
UNIT 1406A, 14/F, THE BELGIAN BANK BUILDING, NOS. 721-725 NATHAN ROAD, MONG KOK HONG KONG

UNIT 1406A, 14/F, THE BELGIAN BANK BUILDING, NOS. 721-725 NATHAN ROAD, MONG KOK HONG KONG


An automatic barrier gate is the heartbeat of a parking lot. It cycles hundreds of times a day, enduring rain, heat, and constant mechanical stress. Yet, most facility managers wait until the gate is stuck—or worse, hits a vehicle—before thinking about maintenance.
Regular preventative maintenance is not just about fixing problems; it’s about predicting them. A well-maintained gate can last over a decade, while a neglected one may fail in just a few years.
In this guide, we break down the 5 essential maintenance steps to ensure your barrier gate system remains safe, reliable, and efficient.
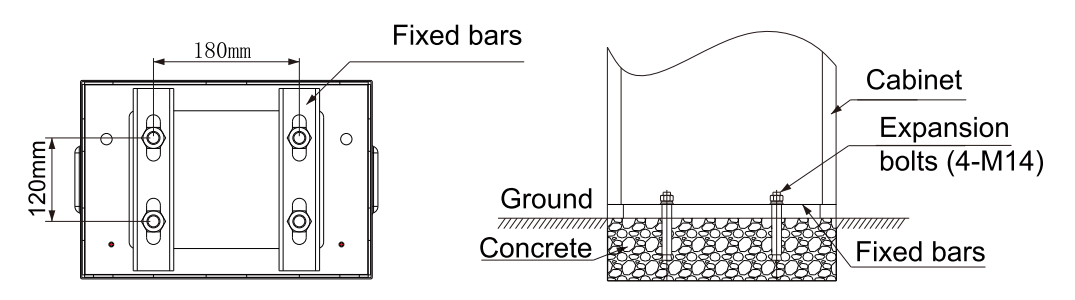
Before opening the housing cabinet, safety is paramount.
The spring is the “muscle” that lifts the arm. If the spring tension doesn’t match the arm’s weight, the motor (gearbox) takes the hit.

The “45-Degree” Test:
Sometimes, the issue isn’t tension adjustment, but Spring Selection. If you have added accessories (like LED lights or a heavy rubber bar) to the arm, you may need a stronger spring.
Refer to the table below to check if your configuration matches standard engineering requirements.
⚠️ Important Disclaimer:
Please note that motor torque and boom arm weight vary significantly between manufacturers. The data in the table below is calibrated specifically for ACCESS TECH barrier gates and is intended for reference purposes only. If you are maintaining a different brand, please consult your specific manual.
| Arm Type & Length | Accessories Installed (Load) | Required Spring Configuration (ACCESS TECH Standard) |
| Straight 2.5m – 3m | None / LEDs / Rubber Bar | 1x Ø4 |
| Straight 3m – 4m | None / LEDs / Rubber Bar | 1x Ø5 |
| Straight 5m | None / LEDs | 1x Ø5 |
| Straight 6m | Rubber Bar + Moving Foot | 1x Ø4 + 1x Ø5 |
| Telescopic 6m | Standard Configuration | 2x Ø5 |
| Telescopic 8m | Heavy Load (Central/Lateral) | 2x Ø5 + 2x Ø6 |
| Oval Articulated (90°) | Length 4m | 2x Ø5 |
| Oval Arm with Skirt | Length 4m | 1x Ø4 + 1x Ø6 |
Friction generates heat and wear. A regular lubrication schedule (every 3-6 months) is essential.
Modern barrier gates rely on sensors for safety. If these fail, the gate becomes a liability risk.
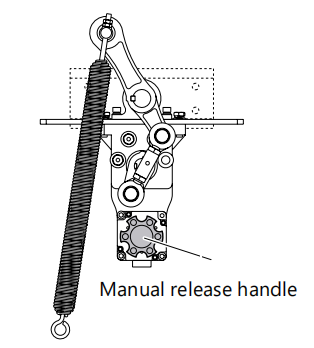
In the event of a power outage, you need to be able to open the gate manually.
Routine maintenance is the difference between a gate that lasts 5 years and one that lasts 15. By following this checklist—checking the bolts, balancing the springs according to the ACCESS TECH chart, and keeping sensors clean—you ensure smooth traffic flow and satisfied users.
Need specific parts or maintenance advice?
Whether you need a replacement spring kit or technical support for your ACCESS TECH barrier, our team is here to help. Contact us today to ensure your system is optimized for peak performance.


